Maintenance safety

maintenance worker work on machine part

Maintenance safety 1. Maintenance Work-Order and time fix: 2. Related Department Permission: 3. Lock-out and tag-out permit: 4. Switch off electrically: 5. Shutt off and lock out power sources: 6. Bericate the machine area: 7. Provide PPEs for worker: 8. Tools management: 8. a. Tools tray: 8. b. The right tool for the right job: … Read more

Fire Emergency

a rescue team strugle to control on fire emergency

What is a fire emergency? When a combustion process or burning of combustible material appears suddenly and out of control this situation is called a fire emergency. Fire Facts Reaction: When the combustion process suddenly appears. It is not controlled with the first struggle with available fire-controlled materials like water, sand, and fire extinguishers. So … Read more

What is personal evacuation plan?

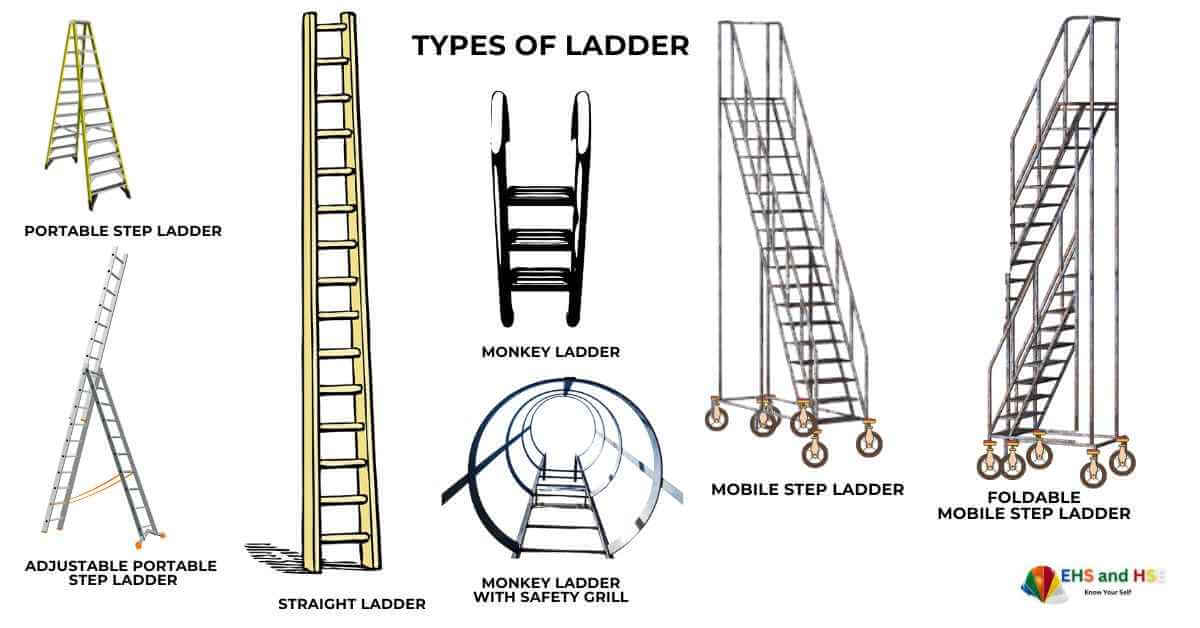
A Personal Evacuation Plan (PEP) is a customized strategy designed to help individuals evacuate safely from a building or area during an emergency, such as a fire, natural disaster, or other emergency situations. This plan takes into account individual needs, abilities, and scenarios to ensure that everyone can respond effectively in the event of an emergency.

Emergency Evacuation Map

The Emergency Evacuation Map guides the workers, visitors, and contractors on the way into the building and coming in going out of the building.

An Emergency Evacuation Map is a map that shows aisle marking on the floor and everything which has volume on the floor. Location of everything on the floor. Emergency Evacuation Map gives importance to exit ways like lifts and stairs in the building.

How to make an Emergency Evacuation Map?

The emergency evacuation map guides the workers and visitors to go out of the building in case of an emergency with safety. The emergency evacuation map highlights the aisle marking, Emergency exit door, normal exit doors, and all equipment related to emergencies.

Creating an effective Emergency Evacuation Map involves several key steps. Here’s a guide to help you design one:

Step-by-Step Guide to Create an Emergency Evacuation Map

  1. Gather Information:
  • Obtain a current floor plan of the building or area.
  • Identify all exits, stairwells, and emergency assembly points outside the building.
  1. Identify Key Locations:
  • Mark important areas such as restrooms, elevators (not to be used in emergencies), and disabled access routes.
  • Highlight potential hazards (e.g., flammable materials, electrical rooms).
  1. Designate Evacuation Routes:
  • Determine the safest and quickest routes to exits from various locations in the building.
  • Ensure these routes are clear of obstacles and accessible for everyone, including people with disabilities.
  1. Use Symbols and Colors:
  • Utilize easily recognizable symbols (e.g., arrows for routes, green for exits, red for hazards) to enhance clarity.
  • Consider color-coding different elements for easy identification.
  1. Add a Legend/Key:
  • Create a legend that explains the symbols and colors used in the map for clarity.
  1. Include Important Information:
  • Provide details such as emergency contact numbers, protocols (e.g., “Do not use elevators”), and the location of emergency equipment (fire extinguishers, first aid kits).
  1. Create Multiple Versions:
  • Design maps for different floors or areas of the building to ensure everyone has access to relevant information.
  1. Test the Map:
  • Conduct a drill to see how well the map works in practice and make any necessary adjustments based on feedback.
  1. Make the Map Visible:
  • Place printed copies of the map in visible locations throughout the building (near entrances, hallways, break rooms).
  • Consider adding digital versions accessible via building management systems or emergency apps.
  1. Regularly Update:
    • Review and update the map regularly, especially after renovations, changes in layout, or after conducting drills.

Tips for Effectiveness:

  • Keep it simple and easy to understand.
  • Use a large enough font and clear graphics.
  • Make sure everyone in the building is aware of the map and understands how to use it.
  • Conduct regular training and drills to create awareness in workers for safe evacuation procedures.

Creating an effective Emergency Evacuation Map can greatly enhance safety during an emergency by helping people navigate quickly.

Types of this map

  1. Building an Emergency Evacuation Map
    • Office blocks
    • Production departments
    • Workshops
    • Power / Boiler houses
    • Laboratories / canteen / cafeterias
  2. Plant / Unit Emergency Evacuation Map
This map is an individual building evacuation map.

This type of map is designed by EHS or the safety department which mentions everything about safety.

Elements of This Map

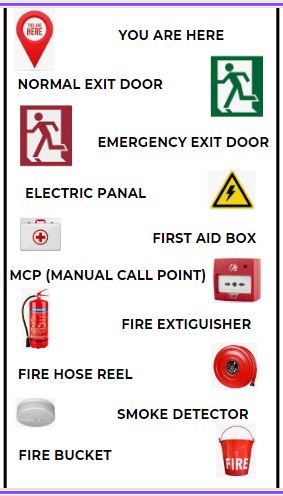
This Map highlights the aisle marking and the following things:

Points

  1. You are Here
  2. Emergency Exit Door
  3. Normal Exit Door
  4. Location of fire extinguishers
  5. Location of electric panels and board
  6. Available fire hose cabinet
  7. Available First aid box
  8. Smoke detector
  9. MCP (Manual Call Point)
  10. Fire and water bucket

Evacuation Policy

The Evacuation Policy of the company is written on the emergency exit map. Any worker, visitor, and contractor read this policy and follow it. This policy is very important and shows the rules of the company. Detailed Evacuation Policy

Evidence

Highlighted points of emergency exit map.

Importance

Emergency Evacuation Map supports the workers and visitors to quickly understand the safe exit ways in case of emergency. The emergency exit plan or evacuation policy can save many workers’ and visitor’s lives.

Location of this map

This map should be located near the main entrance door or the gathering area. Because anyone can find and read this map easily in normal or emergencies.

The Ultimate Guide to Ladder Safety: Tips, Best Practices, and Common Mistakes to Avoid

There are some basic rules for ladder safety.

What is a ladder?

A tool with types and sizes that helps us to climb at a height for different purposes is called a ladder.

Types of ladder

  1. Type ladder
    • Step ladder (A-type)
    • Platform ladder (A-type)
  2. Straight ladder
    • Fixed Straight ladder
    • Extension straight ladder
  3. Step Ladder
    • Fixed step ladder
    • Extension ladder
    • Mobile Step Ladder
    • Extension Mobile Step Ladder
    • Fixed extension step ladder
  4. Monkey Ladder
All types of ladder with ladder safety

Basic Rules for Ladder Safety

There are some basic rules for ladder use safely.

A-type Step ladder safety

  1. Always use a safety helmet when starting work on the ladder.
  2. Always open the stepladder completely and the spreader is locked open before using the ladder.
  3. Never climb onto a ladder from one side, directly upper steps, or from one ladder to another.
  4. Keep your face to the stepladder when climbing up or down.
  5. Put your feet in the center of the ladder’s step.
  6. Choose the right ladder for the right work according to height and space.
  7. Check the load capacity of the ladder before using it.
  8. Inspect the ladder before using it.
  9. Set the ladder at the level surface and up correctly.
  10. Climb and descend the ladder with caution and safety.
  11. Control your body balance while working on a ladder.
  12. Set the ladder at the right place according to the work point.

Straight-type ladder safety

Include these safety points in the above-given safety points

  1. This type of ladder should be fixed with a straight wall at an angle of 75 degrees.
  2. Never lean or reach away from the ladder, hold the ladder when a person climbs at the ladder.
  3. Ensure the ladder’s foot does not slip on the floor.
  4. Depute the person to hold the ladder and control the foot slipping off the ladder.

What angle is a ladder?

The correct angle for an A-type and straight ladder is 75 degrees.

Related Posts

Cleaning of Water Tanks

CLEANING OF UNDRGROUND WATER TANK

HOW OFTEN SHOULD WATER TANKS BE CLEANED?

Water tanks need cleaning after a passage of time. Cleaning of water tanks is essential it prevents us from diseases.

Minimum once a year storage tanks should be cleaned and disinfected. Levels of sediment at certain times of the year, cleaning more often recommended.

TOOLS USE IN THIS OPERATION

WET/DRY VACUUM, SPUNCH, MOP, GLOVES, WATER DELIVERY AND PUMP OUT SUMP PUMP(OPTIONAL), GLASSES, PRESSURE WASHER(OPTIONAL).

Cleaning process of water storage tank

The best method to clean water tanks

☆ Firstly clear The Top of the tank for a clean workspace.

☆ Clear your tools. Clean all tools that will come into contact with the water inside the tank.

☣ (Do not enter the tank unless you are confined space entry trained, are certified to do so, and have all of the appropriate safety gear available)

Fill in the required level of water.

Shut off the valve to the distribution lines.

Wear required personal safety equipment.

Mix chlorine in water required ratio or mix a cleaning solution of 1 part bleach to 4 parts hot water in a clean bucket.

Drain as much water as possible. Drain the tank by using a sump pump. (If you are using a pressure washer with a reservoir ensure that you fill the reservoir with water before draining the tank. If you use a pressure washer without a reservoir do not drain your tank completely).

Once you have drained the tank as much as possible use the wet/dry vacuum to remove the remaining water on the bottom of the tank.

Remove the slime and dirt build-up on the sides and corners of the tank. Scrub the build-up on the bottom and use the wet/dry vacuum to remove the rinse water from the tank.

Then flow out the chlorine or bleach-mixed water.

Flow in plenty of raw water and clean the walls of the tank.

Drain the water from the tank.

Flow in the 2nd time of raw water.

Flow out and then 3rd time flow in raw water and flow out it.

Then flow in drinking water. Take a sample of water and test it in the laboratory for chlorine and PH. If chlorine in water or PH is
more than 6. Flow out the water and then fill the drinking water. Continuously change the water until chlorine presence is 0 and the pH is at required. You can use many different types of chemicals and cleaners for cleaning tanks.

It depends on the type of material of the tank and the capacity of the tank.

What chemicals are used to clean water tanks?

You can use these chemicals for cleaning purposes in water tanks

  1. Chlorine
  2. Hydrogen peroxide
  3. Bleach
  4. Sodium hypochlorite
  5. Amidosulfonic acid
  6. Nitrilotriacetic acid
  7. Isopropanol

How do I clean my water tank from bacteria?

Use bleach for the interior cleaning of the tank and use a 1:1 ratio of bleach and water. 

Emergency Response Team (ERT)

Introduction of Emergency Response Team (ERT)

ERT (Emergency Response Team) This team is assigned and trained by the EHS department. The EHS department chooses the 3-worker from each department in each shift. One worker trained as a firefighter another as a floor warden and a third as the first aider. These workers are trained for emergencies at any time.

Example for understanding

Boarding / Finishing department

Shift (A) 1st Worker Fire Fighter, 2nd Worker First Aider, and third Worker Floor Warden and Duty time 06:00 to 14:00.

Shift (B) 1st Worker Fire Fighter,2nd Worker First Aider, and third Worker Floor Warden and Duty time 14:00 to 22:00.

Shift (C) 1st Worker Fire Fighter, 2nd Worker First Aider, and third Worker Floor Warden and Duty time 22:00 to 06:00.

This setting covers 24 hours of duty time

Responsability of ERT team during emergency

The goals of ERT (Emergency Response Team) are. They coordinate with workers and each other during the emergency to control the emergency and save lives. They inform the safety officer and evacuation coordinator about the situation. Also, they coordinate response efforts, delegate action tasks, and ensure a cohesive approach and goal-oriented efforts. For example, in a fire emergency, the firefighter would assess the situation and start the process to control the fire. The floor warden starts evacuation efforts and coordinates with needy and disabled people for a safe evacuation process. The first-aider coordinates with the firefighter and floor warden during fire fighting and the evacuation process. The companies train their ERT members at the base of the emergency management system.

ERT Members

According to the emergency, trained persons perform specific duties during an emergency, they are the members of ERT. Like first-aider, floor warden, and firefighter.

  • He should know about the place of the first aid box in the department.
  • He ensured all the necessary items used during first aid were in the box.
  • He should know about first aid CPR’s complete procedure.
  • He should take first aid and CPR during an emergency.
  • He should wear gloves before giving first aid.
  • He should call the ambulance in a high emergency.
  • He should inform emergency, accident, and injury to the company medical officer and shift in charge.
  • He should always wear a green reflector jacket during work.
  • He should know about the place of fire extinguishers and hose reels in the department and floor.
  • He should know how the operate the fire extinguisher and operate it in an emergency.
  • According to the type of fire he can use a fire extinguisher.
  • In an emergency, he should press MCP and inform to the EHS department.
  • He should help the EHS department to operate the fire hydrant system in an emergency.
  • He should always wear a red reflector jacket during work.
  • He should know about ways, emergency ways, fire alarms,s and all items related to the EHS department.
  • Ezalz marking, normal exit, and emergency exit ensured clear no restriction.
  • He should know about the people who need help, He helps them in emergencies.
  • He should press the fire alarm and inform the EHS department about the emergency.
  • He should lead all people working in the department to the assembly point in case of emergency. And count all the people.
  • He should inform the emergency coordinator about missing during an emergency.
  • He should note all unsafe work in the department.

Posts Related to the ERT emergency response team

A Comprehensive Guide to Working in Confined Spaces

a worker coming out fron confined space as A Comprehensive Guide to Working in Confined Spaces guideline.

Confined Space Definition

A closed space where one has to breathe with difficulty is called a confined space. The narrow space where the entrance and exit points are single is called a confined space like tanks, trenches, and underground central holes. Limited space is not only underground tanks or tranches, above storage tanks and narrow spaces are also in the confined space category. When you need to work in a confined space “A Comprehensive Guide to Working in Confined Spaces” is essential.

Criteria of confined space

  1. Limited openings for entry and exit, according to workers.
  2. The space is not intended for continuous human occupancy.
  3. The space is large enough for you to enter and conduct work easily.

Types of confined space

Society

  • Tunnels
  • Underground Main Hols
  • Underground Water Tanks
  • Above Storage Tanks

Construction Site

  • Water storage Tanks
  • Basement
  • Elevator/Lifts ways
  • Subcellars
  • Culverts

Industries

  • Cable Trunchs
  • Underground Water & Chemical tanks
  • Underground HVAC Trunchs
  • Cold Storage
  • Boiler
  • Vessels
  • Chimny

Understanding the Risks of Working in Confined Spaces

“A Comprehensive Guide to Working in Confined Spaces” refers to Understanding the Risks of Working in Confined Spaces. and listing these risks and their remedies. Make a list that has types of risks, remedies, and applications, and name it “Risk Assessment Form”.

  1. Configuration Risks
  2. Biological Risks
  3. Physical Risks
  4. Atmospheric Risks

Gases and their proper ventilation

EHS and HSE-trained workers check Gases inside the confined space with the help of available modern apparatus.

  1. Starting point
  2. Middle point
  3. Bottom point

Main Gases

GasSafe level
Oxygen (O2)19.5%-23.5%
Carbon Monoxide (CO)
Hydrogen Sulfide (H2S)10ppm-15ppm
Methane (CH4)
Nitrogen (N2)78.084%
Carbon dioxide (CO2)0.035%
Argon (Ar)0.934%

Combustible gases

Ventilation System

A confined space should be ventilated continuously for 24 hours with the help of a ventilation blower before starting work in the confined space.

Confined space Work Permit.

A work permit is essential to do the desired work. A work permit is permission from EHS, HSE, and the management department to do work. Work Permit issued after checking of gases in confined space to make work procedure safe.

Confined Space work permit template

Logo and Title:
Company Logo and Company Title with the type of permit placed at the top.

Management Section:
Mostly managed by the co-operation of the engineering and production management.

Detailed Worker:
This section is only related to Engineering Management. A supervisor checks and signs it.

Power Sources and Safety Checklist:
A safety supervisor checks and ensures the lock of all power sources and tags all locks.

Extension of Permit Date:

Engineering management fills this section if maintenance is not completed. In case of any reason. The extension date, time, and reason should be mentioned on it.

Permit Completion:

The maintenance supervisor checks the maintenance and signs after the permit.

Important Note: Permit filling name is temporary not expected name. If any name matches the actual name I apologize.

Essential Equipment for Safe Operations in Confined Space

  1. Try Port
  2. Rope to Try port
  3. SBA (Self Breathing Apparatus)
  4. Full Body Harness
  5. Air Blower

Breathing system and apparatus

Signs of Confined Space.

Work procedure step by step.

When starting to work in a confined space, the EHS team visits the location. Create a risk assessment form to find out risks and remedies for safe working. Provide appropriate PPEs for the risk. Bericate the area around the entrance hole. We can divide this procedure into three sections. 1. Before starting work. 2. During work. 3. End of work.

1. Before Starting Work

  1. Management: First, inform all related departments about work in a confined space. Discuss the problem and why we need to work in this confined space.
  2. Work Order: Get a work order designed by a confined space-related department. A work order is a checklist of work that needs to be done.
  3. EHS Department: Make empty the confined space to work in. A trained EHS worker goes inside the confined space to check the gases and breathing difficulties in the confined space. Gases check procedure. Close all valves of lines to the confined space and lockout and tagout them. Switch off all electrical devices, like pumps, gauges, and levels, and lockout and tagout them.
    • Starting Point: Starting point is the entrance point in the confined space. Firstly, check the gas level at the starting point of the confined space.
    • Middle Point: The middle point is the middle of a confined space. Secondly, check gases level in the middle of the confined space.
    • Bottom Point: The bottom is the end point of a confined space. Then, check the gases at the end point of the confined space.
  4. Work Permit: Get a work permit to perform the work in a confined space safely. Ensure the list of gases mentioned in the work permit is at a normal level. And confined space is suitable for work in the confined space.
  5. Essential Equipment: Complete the essential equipment list and check the equipment’s condition before starting work. Ensure all types of equipment are in good condition and suitable for use.

2. During Work in a confined space

  1. Wear Appropriate PPEs: When you enter a confined space, wear appropriate PPEs and check PPEs’ condition and proper functionality.
  2. Safety Precautions: Bericate the entrance point area around 10 feet in a circle with bericate tape. Fix the trial port at the entrance point of the confined space. A rope role around try port’s wheel and the end of the rope is fixed with the full body harness of the entrant, who works in the confined space. The other end of the rope should be held by the Attendant, who stands at the entrance point of the confined space for the help of the entrant in case of an emergency.
    • The Entrant: A person who works in a confined space.
    • Attendants: A person who is stationed outside one or more confined spaces.
  3. Duty of Attendant: The attendant monitors the authorized entrants and performs specific duties. His duties are assigned in a written permit-required confined space.
    • The attendant holds the rope that is linked with the full-body harness of the entrant.
    • He pulls the rope gently after every 10 minutes to take the signal from the entrant.
    • He should be ready to help entrants in case of an emergency.

3. After complete work

  1. Work Satisfaction: Check the work quality and requirements done by the entrant. Some confined spaces work check after high pressure, liquid filling, and under workload.
  2. No Abnormality: Monitor any abnormalities after compliance work. If found any abnormalities then immediately rework it.
  3. Remove Safety: Remove lockout and tagout from valves and pumps. Open valves and switch on pumps. Check compliance work satisfaction. Remove bericate tape.

“A Comprehensive Guide to Working in Confined Spaces” gives proper guideline till complete the work and some safety points for checking after the work.

Emergency Response Planning and Rescue Procedures in Confined Spaces

A Confined Space Emergency Response plan is essential when deciding to work in a confined space. Some points as an emergency plan checklist:

  1. Emergency Response Team (ERT) members should be present.
  2. Mobile stature should be available.
  3. All equipment should be available appropriate for the types of emergency according to confined space.
    • Fire blankets and fire extinguishers for fire emergencies.
    • SCBA (Self-Contained Breathing Apparatus) for suffocation emergencies.

7 Phases of Rescue Operations in confined space

  1. Scene Size-Up: Manage the team for emergency work and give them tasks.
  2. Hazard Control: Control of the hazards for all workers and rescue team safety present at the scene.
  3. Patient Access: Get access to the patient who is in the confined space and seek help.
  4. Medical Treatment: First Aider access to the patient and give medical treatment to the patient.
  5. Disentanglement: Liberate the patient from this situation.
  6. Patient Packaging: A special format of stature or straight wooden plank should be used for the packaging of patients for transfer patients.
  7. Patient Removal/Transport: Transfer the patient from a confined space to a safe place gently and carefully.

Hepatitis B and C

hepatitus symptums in liver

What is hepatitis? A common liver disease that is found all over the world. There are many types of hepatitis but the most lethal/dangerous are hepatitis B and C. The types of hepatitis are, hepatitis A, B, C, D, E, etc. Hepatitis A The hepatitis A virus(A virus is an infectious agent of small size … Read more

Best Practices for Industrial Spillage Control

chemical drum being spillage some instructions written on it.

What is spillage? Spillage is the out-of-control liquid flow on the floor, earth, or any other surface. Secondary containment Secondary containment is pre-spillage control containment.There have been so many incidents where we faced the blast of the chemical tank or oil tank. Chemicals and oil affect vast areas and many people. Controlling this type of … Read more